Dammar Embossing
Published on 07.05.2020 by Rachel
Published on 07.05.2020 by Rachel
- “The Poor Man’s Acid Etch”
I'm very excited about this customer-created tutorial!
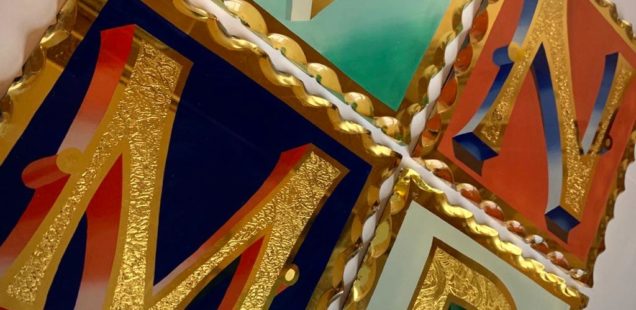
Archie of Irregular Signs demonstrates how to create a beautiful texture to a reverse glass gild. Archie is a friend of Handover and has recently painted a sign for in Handover HQ, you can see that, and more of his work over on his instagram and website.
Archie is also part of the Alphabetics Anonymous collective, together they paint murals (anyone lucky enough to be at Porto Letterheads last year will have been able to see their work!) They also work together to provide a support network for signwriters and lettering artists through sharing advise and occasionally hosting events like the wonderful Galphabetics!
The letters painted for this tutorial and more are currently for sale in the Alphabetics Anonymous shop!
Dammar embossing is a technique used to give a reverse glass gild some texture, without the need for dangerous chemicals. The process involves laying on a thick coat of varnish and manipulating it as it is just about to dry, causing it to set with a pattern.
Step 1 - Prep.
Have your glass cleaned, outlines gilded and everything painted except the areas you want to be embossed.
Step 2 - Mix up your varnish
Traditional Dammar embossing uses Dammar varnish, Quick Rubbing varnish and Res-N-Gel, however in the UK these products are hard to find and expensive to import, so I have replaced them with products easily available at Handover.
In my mix I have used One-Shot Speed Dry Acrylic Clear (thins with white spirit not water, aka not acrylic, what’s that about?) and Jackson’s Gloss Gel. The Gloss Gel provides the body to give the embossing a thick texture, and the Acrylic Clear makes the varnish set fast enough to hold the texture you create.
I would imagine there are a number of different products you could use to get this effect, you just need something thick and something that makes it dry fast, but these are the products I am using in this video. I have found an approximate mix of 2/3 Acrylic Clear and 1/3 Gloss Gel work well for the scale of the projects I have been working on.
Step 3 - Embossing
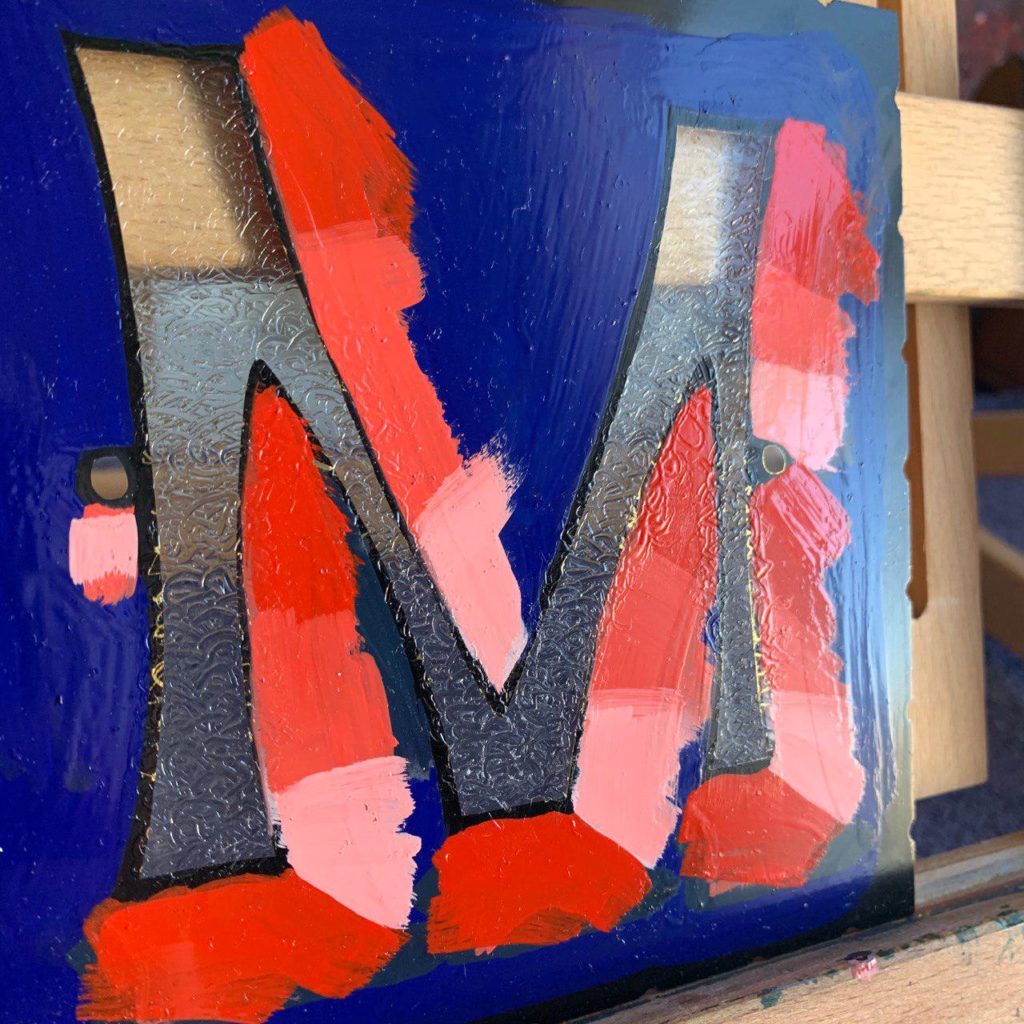
Lay on an even coat of your mix. Leave this to set for a bit, any texturing you do now will most likely fall out and you will loose the pattern. The open time for the varnish depends on the ratio of your mix, I would usually do a quick test on a scrap piece of glass to gauge how long I have before it hardens.
Start manipulating the varnish, I use the wrong end of a paintbrush and make an infinity shape over and over. Start at one end of the letter and work your way to the other and then start again, keep going until it has fully hardened. Leave this to dry overnight.
Step 4 - Water gilding
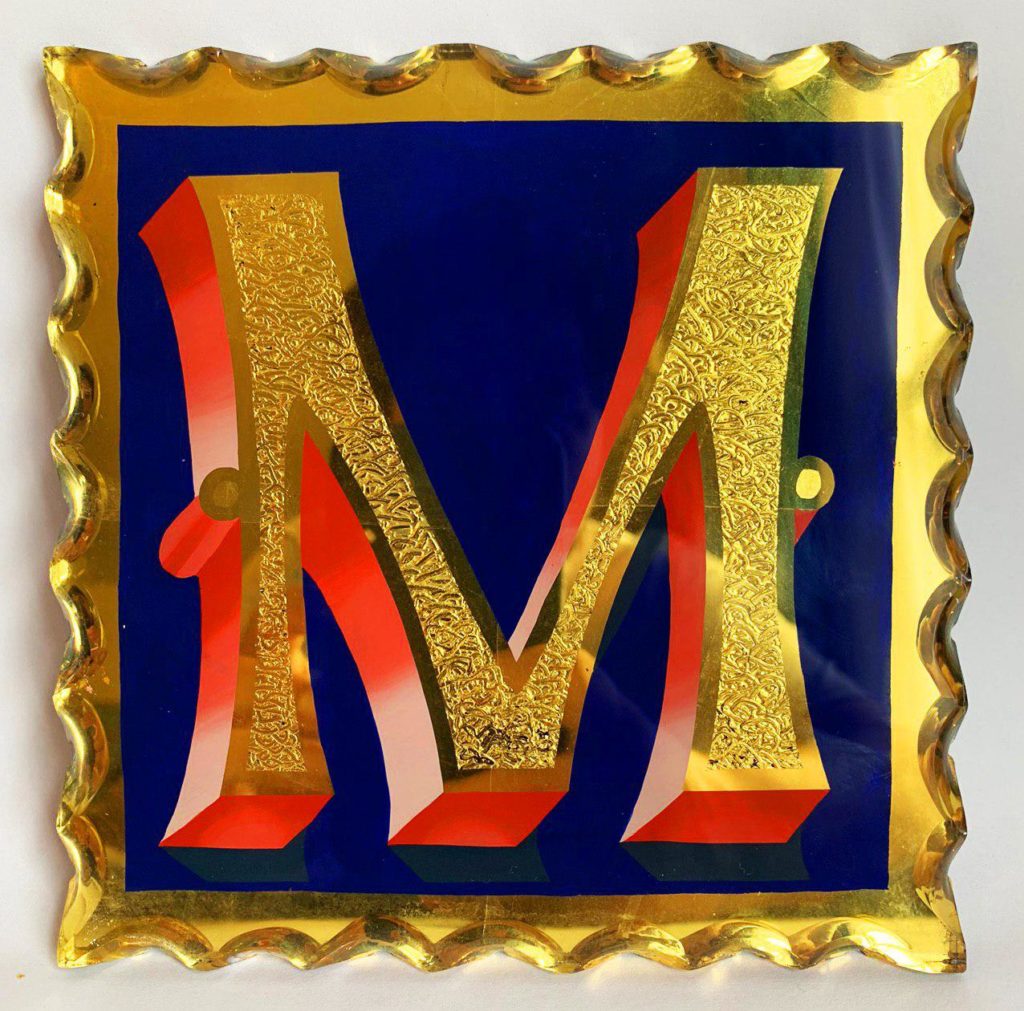
Once your mix is fully dry, do a normal water gild over the back. You will need to do two gilds and a patch coat because due to the texture, the burnishing is likely to take off bits of your gild. Then back this up with Nazdar to protect it.
Step 5 - Turn over
Turn over your glass and marvel at your creation. You have executed a beautifully textured glass gild and you haven’t spilt any hydrofluoric acid on yourself, RESULT!
For Best Effect:
To get the most effective acid etch mimic, water gild the outlines of your letters first and then use this technique to fill in the centers.
Get as tight a pattern as possible, in this video tutorial I make dammar ‘swirls’ which are one of the most forgiving (and in my opinion most attractive) patterns to make. Real acid etching is more akin to a stipple, giving it that shimmering glitter like quality, so whatever pattern you choose, make it quite condensed so that the light is bouncing off it in different directions as much as possible.
Make samples. I would get a scrap piece of glass and just try out a few ratios and textures before you put this effect onto a finished piece, it is an easy technique to do but does take a bit of experimenting to get it looking exactly how you want it to.
Be patient, you may have to do each letter one at a time, so that the varnish doesn’t set too soon on the letters you aren’t manipulating.
Read as many books on gilding as you can find, they probably explain this in a more old-timey manner, but there instruction is sound and they are full of inspiration.
Enjoy.
--
Archie,
Irregular Signs
Hooray!
Product added to basket!
